
Develop a NLP Model in Python & Deploy It with Flask, Step by Step
Flask API, Document Classification, Spam Filter
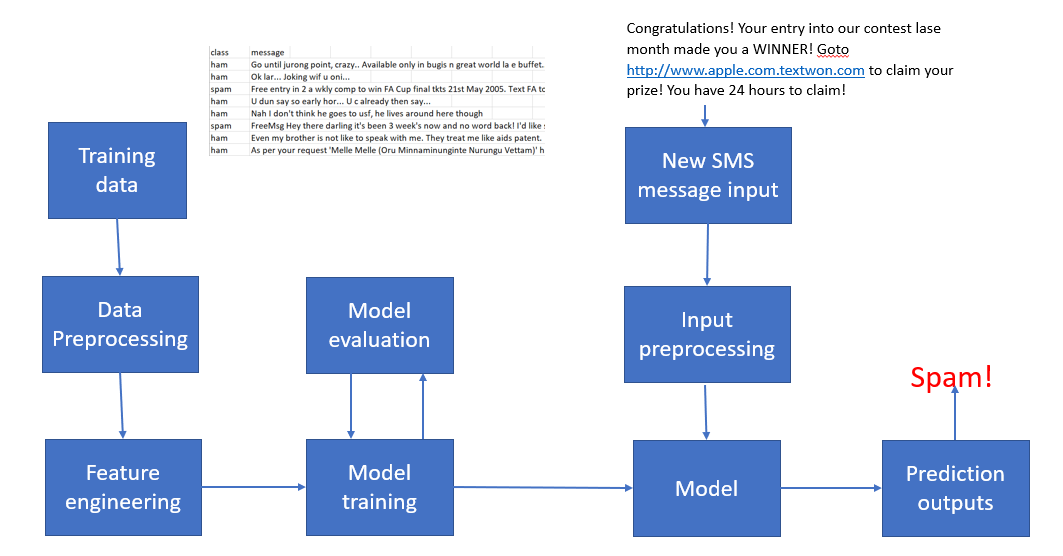
ML을 활용하여 스팸 SMS 텍스트 메시지를 적발하는 시스템을 만들어보자. ML 시스템의 워크 플로우는 다음과 같다.
Train offline -> Make model available as a service -> Predict online.
- 분류기는 스팸과 스팸이 아닌 메시지를 가지고 오프라인으로 훈련을 하게 된다.
- 훈련된 모델은 서버 사용자에게 서비스 형식으로 배포된다.
https://cdn-images-1.medium.com/max/1080/1*QverR-xExd4UvfLh3Iq79w.png
모델을 배포하는 경우 생각해야할 점은 다른 사용자가 어떻게 사용할 수 있도록 할 것인에 대한 방식의 문제를 생각해야 한다. 실제 모델을 구축하는 것과 상품이나 서비스에서 이를 적용하는 것에는 큰 차이가 있기 마련이다.
여기서는 모델을 구축하고, Flask를 사용하여 해당 모델에 대한 API 를 생성하는 2가지 측면에 모두 중점을 두고 진행하도록 한다. 이 API는 HTTP 요청을 통해 예측 능력을 발휘하게 될 것이다. 그럼, 시작해보자.
ML Model Building
여기서 사용하는 데이터는 스팸 또는 스팸이 아닌 것은 태깅된 SMS 메시지의 집합이다. 해당 데이터는 여기서 다운로드 할 수 있다.
나이브 베이즈 분류기 (Naive Bayes classifiers)는 이메일 필터링과 관련하여 널리 쓰이는 통계기법이다. 보통 스팸 메일을 구별하기 위해 bag of words 기능을 사용한다. 여기서도 나이브 베이즈 이론을 사용하여 간단한 메시지 분류기를 만들어본다.
spam.csv가 위치한 디렉토리에 다음과 같은 NB_spam.py 파일을 만든 후 노트북에서 실행한다.
import pandas as pd
import numpy as np
from sklearn.feature_extraction.text import CountVectorizer
from sklearn.model_selection import train_test_split
from sklearn.naive_bayes import MultinomialNB
from sklearn.metrics import classification_report

df = pd.read_csv('spam.csv', encoding="latin-1")
df.drop(['Unnamed: 2', 'Unnamed: 3', 'Unnamed: 4'], axis=1, inplace=True)
df['label'] = df['v1'].map({'ham': 0, 'spam': 1})
X = df['v2']
y = df['label']
cv = CountVectorizer()
X = cv.fit_transform(X) # Fit the Data
X_train, X_test, y_train, y_test = train_test_split(X, y, test_size=0.33, random_state=42)
#Naive Bayes Classifier
clf = MultinomialNB()
clf.fit(X_train,y_train)
clf.score(X_test,y_test)
y_pred = clf.predict(X_test)
print(classification_report(y_test, y_pred))
NB_spam.py
  precision    recall  f1-score   support

          0       0.99      0.99      0.99      1587
          1       0.93      0.92      0.92       252

avg / total       0.98      0.98      0.98      1839
나이브 베이즈 분류기는 구현하기도 쉬울 뿐만 아니라 성과 측면에서도 괜찮은 결과를 보여준다. 모델을 훈련시킨 후, 추후 사용에 대비하여 모델을 .pkl 파일로 저장한다.
from sklearn.externals import joblib
joblib.dump(clf, 'NB_spam_model.pkl')저장된 모델은 다음과 같이 로드할 수 있다.
NB_spam_model = open('NB_spam_model.pkl','rb')
clf = joblib.load(NB_spam_model)
상기 프로세스는 “persist model in a standard format” 이라고 부른다.
The above process called “persist model in a standard format”, that is, models are persisted in a certain format specific to the language in development.
And the model will be served in a micro-service that expose endpoints to receive requests from client. This is the next step.
Turning the Spam Message Classifier into a Web Application
앞선 섹션에서 SMS 메시지를 분류하는 코드가 준비되었으므로, 메시지를 입력할 수 있는 폼 필드를 가진 간단한 웹페이지로 구성된 웹어플리케이션을 만들어볼 것이다. 메시지를 웹 어플리케이션으로 입력한 후, 새로운 페이지를 통해 해당 메시지가 스팸인지 아닌지를 알려줄 것이다.
먼저 플라스크 설치 관련해서는 다음 링크를 참조한다 https://antilibrary.org/2001
먼저, 프로젝트를 생성한다. 해당 프로젝트는 다음의 디렉토리 구조와 파일을 가지게 된다. 이후 하나씩 설명한다.
spam.csv
app.py
templates/
        home.html
        result.html
static/
style.cssapp.py
app.py 파일은 플라스크 웹 어플리케이션을 구동하기 위해 파이썬 인터프리터에 의해 실행되는 메인코드를 포함하고 있다. SMS 메시지를 분류하기 위한 ML 코드가 여기 포함되어 있는 것이다.
from flask import Flask,render_template,url_for,request
import pandas as pd
import pickle
from sklearn.feature_extraction.text import CountVectorizer
from sklearn.naive_bayes import MultinomialNB
from sklearn.externals import joblib


app = Flask(__name__)

@app.route('/')
def home():
	return render_template('home.html')

@app.route('/predict',methods=['POST'])
def predict():
	df= pd.read_csv("spam.csv", encoding="latin-1")
	df.drop(['Unnamed: 2', 'Unnamed: 3', 'Unnamed: 4'], axis=1, inplace=True)
	# Features and Labels
	df['label'] = df['v1'].map({'ham': 0, 'spam': 1})
	X = df['v2']
	y = df['label']

	# Extract Feature With CountVectorizer
	cv = CountVectorizer()
	X = cv.fit_transform(X) # Fit the Data
	from sklearn.model_selection import train_test_split
	X_train, X_test, y_train, y_test = train_test_split(X, y, test_size=0.33, random_state=42)
	#Naive Bayes Classifier
	from sklearn.naive_bayes import MultinomialNB

	clf = MultinomialNB()
	clf.fit(X_train,y_train)
	clf.score(X_test,y_test)
	#Alternative Usage of Saved Model
	# joblib.dump(clf, 'NB_spam_model.pkl')
	# NB_spam_model = open('NB_spam_model.pkl','rb')
	# clf = joblib.load(NB_spam_model)

	if request.method == 'POST':
		message = request.form['message']
		data = [message]
		vect = cv.transform(data).toarray()
		my_prediction = clf.predict(vect)
	return render_template('result.html',prediction = my_prediction)


if __name__ == '__main__':
        app.run(host='0.0.0.0', debug=True)
단일 모듈로 어플리케이션을 구동했다. Flask 가 동일한 디렉토리내에서 HTML 템플릿 폴더를 찾을 수 있도록 __name__ 인수를 가지고 새로운 인스턴스를 초기화한다.
다음으로 home 함수가 실행되도록하기 위한 URL 을 특정하기 위해 라우트 데코레이터 (@app.route('/'))를 사용했다.
home 함수는 템플릿 폴더에 위치한 home.html 이라는 HTML 파일을 단순히 렌더링시키는 역할을 한다.
predict 함수로 스팸 데이터셋에 접근하여 텍스트 전처리, 그리고 예측 후 모델을 저장하게 된다. 사용자에 의해 새롭게 입력된 메시지에 접근, 모델을 이용하여 라벨링을 위한 예측을 하게 된다.
메시지 바디에 있는 폼 데이터를 서버에 전송하기 위해 POST 메서드를 사용했다. 그리고 app.run 메서드에 포함된 debug=True 인수를 이용하여 플라스크의 디버거를 향후 활성화시키게된다.
끝으로 이 스크립트가 파이썬 인터프리터에 의해 직접 실행될 때 서버의 어플리케이션을 구동하게 하기 위해 run 함수를 사용했다.
home.html
아래는 사용자가 메시지를 입력할 수 있는 텍스트 폼을 렌더링해주는 home.html 파일의 내용이다.
<!DOCTYPE html>
<html>
<head>
	<title>Home</title>
	<!-- <link rel="stylesheet" type="text/css" href="../static/css/styles.css"> -->
	<link rel="stylesheet" type="text/css" href="{{ url_for('static', filename='css/styles.css') }}">
</head>
<body>

	<header>
		<div class="container">
		<div id="brandname">
			Machine Learning App with Flask
		</div>
		<h2>Spam Detector For SMS Messages</h2>

	</div>
	</header>

	<div class="ml-container">

		<form action="{{ url_for('predict')}}" method="POST">
		<p>Enter Your Message Here</p>
		<!-- <input type="text" name="comment"/> -->
		<textarea name="message" rows="4" cols="50"></textarea>
		<br/>

		<input type="submit" class="btn-info" value="predict">

	</form>

	</div>


</body>
</html>
style.css
home.html 파일의 헤더 섹션에서 styles.css 파일을 로딩했다. CSS는 Flask가 정적 파일을 찾을 수 있도록 static 라고 불리는 서브 디렉토리에 저장되어야 한다.
body{
	font:15px/1.5 Arial, Helvetica,sans-serif;
	padding: 0px;
	background-color:#f4f3f3;
}

.container{
	width:100%;
	margin: auto;
	overflow: hidden;
}

header{
	background:#03A9F4;#35434a;
	border-bottom:#448AFF 3px solid;
	height:120px;
	width:100%;
	padding-top:30px;

}

.main-header{
			text-align:center;
			background-color: blue;
			height:100px;
			width:100%;
			margin:0px;
		}
#brandname{
	float:left;
	font-size:30px;
	color: #fff;
	margin: 10px;
}

header h2{
	text-align:center;
	color:#fff;

}


.btn-info {background-color: #2196F3;
	height:40px;
	width:100px;} /* Blue */
.btn-info:hover {background: #0b7dda;}


.resultss{
	border-radius: 15px 50px;
    background: #345fe4;
    padding: 20px;
    width: 200px;
    height: 150px;
}
result.html
텍스트 필드를 통해 사용자가 입력한 텍스트를 보여주기위한 app.py 스크립트내 predict 함수에 포함된 render_template('result.html', prediction=my_prediction) 을 통해 렌더링이 가능하도록 result.html 파일을 생성했다. result.html 파일에는 다음의 내용이 포함된다.
<!DOCTYPE html>
<html>
<head>
	<title></title>
    <link rel="stylesheet" type="text/css" href="{{ url_for('static', filename='css/styles.css') }}">
</head>
<body>

	<header>
		<div class="container">
		<div id="brandname">
			ML App
		</div>
		<h2>Spam Detector For SMS Messages</h2>

	</div>
	</header>
	<p style="color:blue;font-size:20;text-align: center;"><b>Results for Comment</b></p>
	<div class="results">


	{% if prediction == 1%}
	<h2 style="color:red;">Spam</h2>
	{% elif prediction == 0%}
	<h2 style="color:blue;">Not a Spam (It is a Ham)</h2>
	{% endif %}

	</div>

</body>
</html>
result.htm 에서는 일반적으로 HTML 파일에서 볼 수 없는 아래와 같은 구문을 발견할 수 있다.
{% if prediction ==1%},{% elif prediction == 0%},{% endif %}
이는 jinja 구문으로 HTML 파일 내의 HTTP 요청으로부터 반환되는 예측에 접근하기위해 사용된다.
이제 거의 다 끝났다.
다음 라이브러리가 설치되어있지 않은 경우 다음과 같이 설치한다.
(cooke) founder@casey:~/mandart/glass$ conda install -c anaconda pandas
(cooke) founder@casey:~/mandart/glass$ conda install -c anaconda scikit-learn
(cooke) founder@casey:~/mandart/glass$ python app.py
 * Serving Flask app "app" (lazy loading)
 * Environment: production
   WARNING: Do not use the development server in a production environment.
   Use a production WSGI server instead.
 * Debug mode: on
 * Running on http://127.0.0.1:5000/ (Press CTRL+C to quit)
 * Restarting with stat
 * Debugger is active!
 * Debugger PIN: 688-123-456
웹브라우저를 열고 http://127.0.0.1:5000 를 실행해보면, 다음과 같은 간단한 웹사이트를 볼 수 있다. 그렇지 않고 다음과 같이 This site can't be reached. 라고 뜨는 경우 다음과 같이 app.py를 수정후 실행한다.

if __name__ == '__main__': app.run(host='0.0.0.0', debug=True)(cooke) founder@casey:~/mandart/glass$ python app.py
* Serving Flask app "app" (lazy loading)
* Environment: production WARNING: Do not use the development server in a production environment. Use a production WSGI server instead.
* Debug mode: on
* Running on http://0.0.0.0:5000/ (Press CTRL+C to quit)
* Restarting with stat
* Debugger is active!
* Debugger PIN: 688-123-456
몇 가지 테스트를 해보자. 아래 메시지를 입력하면 스팸이라는 예측결과가 나온다.
Free entry in 2 a wkly comp to win FA Cup final tkts 21st May 2005. Text FA to 87121 to receive entry question(std txt rate)T&C's apply 08452810075over18's


아래 메시지는 스팸이 아닌 것으로 예측 결과가 나온다.
For fear of fainting with the of all that housework you just did? Quick have a cuppa


이로써 단대단 머신러닝 (NLP) 어플리케이션이 완성되었다. 머신러닝 이론을 실제 웹 어플리케이션에 적용했다는 점이 중요하다.
Reference:
https://towardsdatascience.com/develop-a-nlp-model-in-python-deploy-it-with-flask-step-by-step-744f3bdd7776
'Season 1 아카이브 > 프로그래밍' 카테고리의 다른 글
| 워드프레스 관리자 로그인 오류 Redirect loop when trying to login to /wp-admin/ (0) | 2019.06.16 |
|---|---|
| AttributeError: module 'tensorflow' has no attribute 'get_default_graph' (2) | 2019.04.26 |
| 터미널세션 녹화 및 공유기 asciinema (0) | 2019.04.20 |
| 리눅스 디렉토리 크기 구하기 How to Get the Size of a Directory in Linux (0) | 2019.04.04 |
| ImportError: cannot import name '_validate_lengths' from 'numpy.lib.arraypad' (0) | 2019.03.16 |