구글 클라우드 TTS(Text-to-Speech)는 텍스트를 자연스러운 음성으로 변환해 MP3/WAV로 저장할 수 있는 Google Cloud 서비스입니다. 이 글에서는 API 활성화 → 서비스계정 키(JSON) 생성 → Colab 예제 실행 → MP3 다운로드까지, 처음 하는 분도 그대로 따라 할 수 있게 단계별로 정리했습니다. 특히 검색이 많은 “google cloud tts / 구글 클라우드 tts / 구글 tts api 사용법” 흐름에 맞춰 오류 포인트도 함께 다룹니다.

- API 활성화: Google Cloud Console → Text-to-Speech API 사용 설정
- 서비스 계정 키(JSON) 생성 후 다운로드
- Colab 설치:
pip install --upgrade google-cloud-texttospeech - 인증 설정: JSON 업로드 →
GOOGLE_APPLICATION_CREDENTIALS지정 - 음성 변환:
synthesize_speech실행 → MP3/WAV 파일 생성 - MP3 다운로드: Colab에서
files.download("output.mp3")
지난 번 OpenAI TTS 사용법 총정리! 플레이그라운드 및 Google Colab에서 음성 파일 생성하기 에 이어 이번에는 Google Cloud TTS API를 사용하여 텍스트를 음성(mp3, wav 등)으로 변환하고, 해당 음성 파일을 다운로드하는 방법을 다룹니다. Google Cloud의 Text-to-Speech (TTS) API 는 텍스트를 자연스러운 음성으로 변환하는 기능을 제공합니다.
Google Cloud TTS API 바로가기 :
https://console.cloud.google.com/apis/api/texttospeech.googleapis.com

1. Google Cloud TTS API 설정하기
먼저 Google Cloud TTS API를 사용하려면 Google Cloud Platform(GCP)에서 프로젝트를 설정하고 API를 활성화해야 합니다.
Google Cloud TTS API 활성화 방법
1) Google Cloud Console (https://console.cloud.google.com/) 에 접속합니다.
2) 새 프로젝트를 생성하거나 기존의 기존 프로젝트를 선택합니다.
3) Cloud Text-to-Speech API 를 다음과 같이 활성화합니다.

API 라이브러리 에서 Text-to-Speech API 검색 후 사용버튼을 클릭합니다.


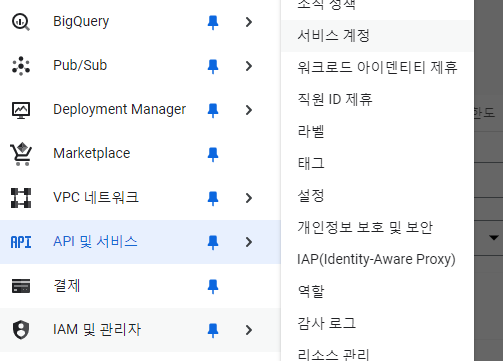
4) 서비스 계정(Service Account) 생성 및 인증 키(JSON)를 다운로드합니다.
- IAM & 관리 > 서비스 계정 메뉴 이동

5) 서비스 계정을 다음과 같이 생성합니다.


6) 새 서비스 계정 생성 후 다음 단계 역할(Role) 에서 편집자를 선택합니다.


7) 해당 서비스의 세부정보관리를 누른 후 키 추가를 진행한다.

8) 새 키(Key) 만들기를 통해 키를 생성한 후 JSON 파일로 다운로드한다.


2. Google Colab에서 Google Cloud TTS API 사용하기
그러면 이제 Google Cloud의 TTS API를 Google Colab에서 실행하는 방법을 단계별로 알아보겠습니다.
1) 먼저 Google Cloud SDK 및 TTS 라이브러리를 설치합니다. Colab에서 Google Cloud API를 사용하려면 다음과 같이 필요한 라이브러리를 설치해야 합니다.
pip install --upgrade google-cloud-texttospeech
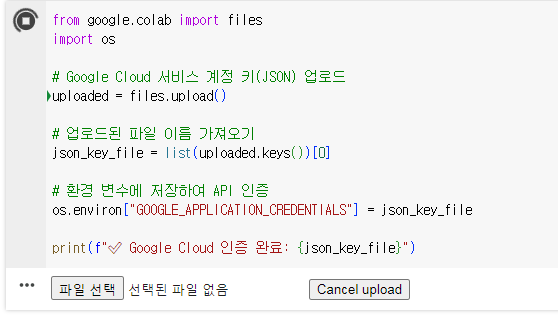
2) 서비스 계정 인증을 위한 좀 전에 다운로드한 JSON 파일 형태의 키를 업로드합니다. 다운로드한 JSON 키 파일을 Colab에 업로드하고, 이를 사용하여 Google Cloud TTS API에 인증하게 됩니다.

from google.colab import files
import os

# Google Cloud 서비스 계정 키(JSON) 업로드
uploaded = files.upload()

# 업로드된 파일 이름 가져오기
json_key_file = list(uploaded.keys())[0]

# 환경 변수에 저장하여 API 인증
os.environ["GOOGLE_APPLICATION_CREDENTIALS"] = json_key_file

print(f"✅ Google Cloud 인증 완료: {json_key_file}")
인증이 완료되면 Google Cloud TTS API를 사용할 준비가 끝납니다.
3) Google Cloud TTS API로 음성 변환 및 다운로드
이제 텍스트를 음성(mp3, wav)으로 변환하는 코드를 실행해 봅시다. 언어, 목소리 유형, 속도(speed), 음정(pitch) 등 다양한 옵션을 설정할 수 있습니다.
from google.cloud import texttospeech
from datetime import datetime

# 클라이언트 생성
client = texttospeech.TextToSpeechClient()

# 변환할 텍스트 입력
text_input = texttospeech.SynthesisInput(text="안녕하세요! Google Cloud TTS API를 사용하여 음성을 생성합니다.")

# 음성 설정 (언어 및 음색 선택)
voice = texttospeech.VoiceSelectionParams(
    language_code="ko-KR",  # 한국어(Korean)
    name="ko-KR-Standard-A",  # 남성 또는 여성 목소리 (A, B, C, D 선택 가능)
    ssml_gender=texttospeech.SsmlVoiceGender.NEUTRAL  # 음성 톤 (NEUTRAL, MALE, FEMALE)
)

# 오디오 설정 (파일 형식 및 속성)
audio_config = texttospeech.AudioConfig(
    audio_encoding=texttospeech.AudioEncoding.MP3,  # MP3, LINEAR16(WAV), OGG_OPUS 지원
    speaking_rate=1.0,  # 속도 (기본값: 1.0, 느리게: 0.5, 빠르게: 2.0)
    pitch=0.0,  # 음정 조절 (-20.0 ~ 20.0)
)

# 음성 합성 실행
response = client.synthesize_speech(input=text_input, voice=voice, audio_config=audio_config)

# 파일명 생성 (날짜 및 시간 포함)
current_time = datetime.now().strftime("%Y%m%d_%H%M%S")
file_name = f"gcloud_tts-ko-KR-Standard-A-{current_time}.mp3"

# 음성 파일 저장
with open(file_name, "wb") as out:
    out.write(response.audio_content)
    print(f"✅ 음성 파일 생성 완료: {file_name}")
이상의 내용을 반영한 최종코드는 다음과 같습니다.
import os
import openai
from google.colab import files
from google.cloud import texttospeech
from datetime import datetime

# ✅ 1. Google Cloud 서비스 계정 인증
uploaded = files.upload()  # JSON 키 파일 업로드
json_key_file = list(uploaded.keys())[0]

# 환경 변수에 인증 정보 저장
os.environ["GOOGLE_APPLICATION_CREDENTIALS"] = json_key_file
print(f"✅ Google Cloud 인증 완료: {json_key_file}")

# ✅ 2. Google Cloud TTS 클라이언트 생성
client = texttospeech.TextToSpeechClient()

# ✅ 3. 음성 변환할 텍스트 입력
text_input = texttospeech.SynthesisInput(text="안녕하세요! Google Cloud TTS API를 사용하여 음성을 생성합니다.")

# ✅ 4. 음성 설정 (언어 및 목소리 선택)
voice = texttospeech.VoiceSelectionParams(
    language_code="ko-KR",  # 한국어(Korean)
    name="ko-KR-Standard-A",  # 음성 선택 (A, B, C, D)
    ssml_gender=texttospeech.SsmlVoiceGender.NEUTRAL  # 중립적인 목소리
)

# ✅ 5. 오디오 설정 (속도 및 음정 조절 가능)
audio_config = texttospeech.AudioConfig(
    audio_encoding=texttospeech.AudioEncoding.MP3,  # MP3, WAV, OGG 지원
    speaking_rate=1.0,  # 음성 속도 (기본값: 1.0, 느리게: 0.5, 빠르게: 2.0)
    pitch=0.0,  # 음성 톤 조절 (-20.0 ~ 20.0)
)

# ✅ 6. Google Cloud TTS API 호출하여 음성 생성
response = client.synthesize_speech(input=text_input, voice=voice, audio_config=audio_config)

# ✅ 7. 파일명 자동 생성 (타임스탬프 포함)
current_time = datetime.now().strftime("%Y%m%d_%H%M%S")
file_name = f"gcloud_tts-ko-KR-Standard-A-{current_time}.mp3"

# ✅ 8. 생성된 음성 파일 저장
with open(file_name, "wb") as out:
    out.write(response.audio_content)
    print(f"✅ 음성 파일 생성 완료: {file_name}")

# ✅ 9. 생성된 음성 파일 다운로드
files.download(file_name)

3. 결론: Google Cloud TTS API 활용법 정리
1) API 활성화 -Google Cloud Console에서 Text-to-Speech API 활성화
2) 서비스 계정 생성 - 인증 JSON 키 파일 다운로드 및 업로드
3) 라이브러리 설치 - pip install google-cloud-texttospeech
4) 음성 변환 코드 실행 - 한국어 음성 변환 (ko-KR-Standard-A)
5) 음성 파일 다운로드 - files.download(file_name)
6) Google Drive 저장 (선택) - !mv file_name /content/drive/MyDrive/
'Season 1 아카이브 > 프로그래밍' 카테고리의 다른 글
| 구글의 Project IDX에서 Django 개발하기: 클라우드IDE가 로컬 환경을 대체할 수 있을까? (0) | 2025.03.30 |
|---|---|
| 구글의 클라우드 기반 IDE 'Project IDX'의 등장: 풀스택 개발 환경의 혁신을 가져올까? (0) | 2025.03.22 |
| Google Colab에서 OpenAI API Key 안전하게 저장하고 사용하는 방법 (0) | 2025.02.20 |
| OpenAI TTS 사용법 총정리! 플레이그라운드 및 Google Colab에서 음성 파일 생성하기 (0) | 2025.02.20 |
| Xcode 프로젝트 완벽 삭제 가이드 – 깨끗하게 정리하는 방법 (1) | 2024.12.27 |